Limit device traffic to only one MX uplink

Hi all

The Meraki MX devices gives you an easy way of automaticly use 2 uplinks. It works seamlessly but it’s hard to do some configuration that is possible on other Cisco devices.

One of those is to deny specific devices to connect over only 1 of the uplinks. Let’s say that WAN 1 is a fiber connection. You got enogh capacity to send and receive all kind of traffic. WAN 2 on the other hand is a sattelite connection. The 2 big drawbacks with sattelite is latency and speed. Sometimes even the cost per MB transferred. Often the guaranteed bandwith on a satelite connection could be as low as 64 kb/s. It’s not much bandwith for other devices then.
wanmeraki

Then the big question is, how do you limit the connection to only use WAN 1. This could be a device that sync data every hour and would generate traffic or a whole subnet with guest wifi users. You don’t want these devices use your costly satelite connection. You do most likely need it for business critical applications.

I spent a few good hours trying to find a solution to this. I asked help from Meraki and various forums. I always got told that traffic shaping should help etc. But the only thing it does is giving me the preferred uplink, it never blocks the traffic from going online if the other WAN connection is down.

The solution I came up with was to turn off NAT when you use the interface that should be blocked. All the devices behind the Meraki that should be blocked does need to be in a seperate VLAN. In version 15 you can exclude specific VLAN from the NAT policy on the uplinks. The traffic will then stop since there is no return route for the traffic (as long as youo don’t add a static route).

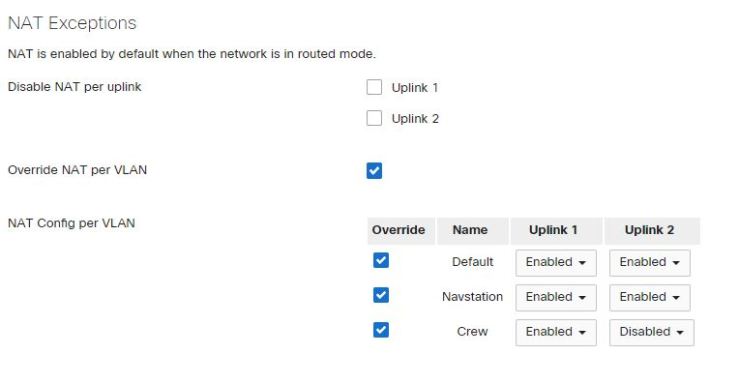
So in the above example we want VLAN 20 to only have access over WAN 1 and not WAN 2. You start by finding the network you want to do the change on in the Meraki Dashboard. Then go to Security & SD-WAN and Adressing and VLAN’s on the left side. In the bottom of the page you have NAT exceptions where you can choose to disable NAT on the different uplinks. In my screenshot I have excepted Crew network from the NAT policy. With this config the devices on Crew VLAN can’t use WAN 2/Uplink 2.
NAT meraki

Advertisement

Backup and restore config of Mobility Express.

Hi all

Lately I have been working with the mobility express AP’s from Cisco.  One of the important things to do when you set up new equipment is to have a backup and restore policy for the config.. I chose the easy way out using tftp, it’s the quickest and easiest way to transfer files as long as you have the tftp server secured. The other option you have is ftp.

transfer upload mode tftp
Sets the mode to tftp, you can also choose ftp but then you need to add in username and password too.

transfer upload datatype config
Choose config as the information to store on the server

transfer encrypt enable
Turns on encryption for the file

transfer encrypt set-key supersecret
Gives the encryption a password

transfer upload serverip 10.10.10.10
Gives the ME an IP to the server where to store the config

transfer upload filename MEconfig.cfg
Filename for the config.

transfer upload start
Start the upload.

transfer upload mode tftp
transfer upload datatype config
transfer encrypt enable
transfer encrypt set-key supersecret
transfer upload serverip 10.10.10.10
transfer upload filename MEconfig.cfg
transfer upload start

You should then get the following output.

Mode……………………………………… TFTP
TFTP Server IP…………………………….. 10.10.10.10
TFTP Path………………………………….
TFTP Filename……………………………… MEconfig.cfg
Data Type…………………………………. Config File
Encryption………………………………… Enabled

Are you sure you want to start? (y/N) y

File transfer operation completed successfully.

So far you have done the backup. Then the second most important thing comes, do the restore. It’s almost the same, but you swap out upload with download.

transfer download datatype config
transfer download mode tftp
transfer encrypt enable
transfer encrypt set-key supersecret
transfer download serverip 10.10.10.10
transfer download filename MEconfig.cfg
transfer download start

After the commands have been entered you should see the following output.

Mode............................................. TFTP
Data Type........................................ Config
TFTP Server IP................................... 10.10.10.10
TFTP Packet Timeout.............................. 6
TFTP Max Retries................................. 10
TFTP Path........................................
TFTP Filename.................................... MEconfig.cfg
Encrypt/Decrypt Flag............................. Enabled

Warning: Downloading configuration will cause the controller to reset...

This may take some time.
Are you sure you want to start? (y/N) y

TFTP Config transfer starting.

TFTP receive complete... updating configuration.

CCO Username & Password will NOT be imported. Please Re-Configure the Credentials 'transfer download ap-images cco-username '
'transfer download ap-images cco-password ' after bootup for Image Download

TFTP receive complete... storing in flash.

Sync config to peers.

System being reset.