In the company where I work we deliver some of our product using boats. Since most of our customers are in remote locations we use a supplier that have good coverage in those locations. The issue then becomes that the same supplier has a high cost on the bandwidth and they don’t have a good coverage in the areas where our factories are. To reduce cost and ensure good coverage close to our factories we have a wireless network that the boats connect to when they arrive. I have added a picture with a simple diagram showing the solution.
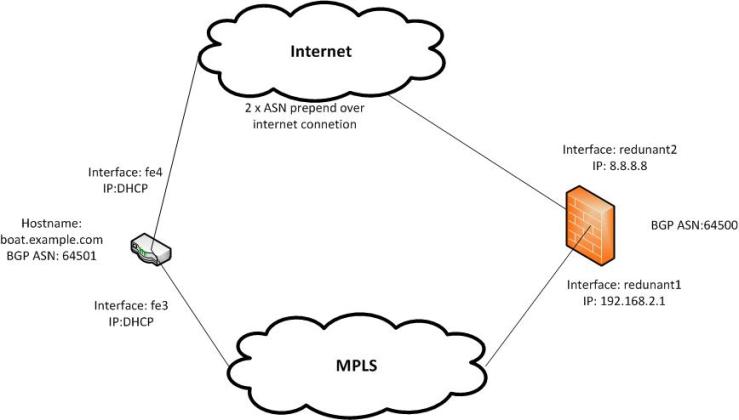
At the moment we have Juniper SSG550M in a central location as our VPN hub. We have just recently started to buy Cisco routers instead of Juniper firewalls for the boats. So I had to configure the Cisco routers so they would automatically switch between the 2 connections and always try to choose our wireless connection first (the connection close to our factories).
I did this with the help of BGP and gave the expensive connection more AS path compared to our wireless connection at the factories. The VPN is a VTI/Routing based tunnel.
I will first start with the configuration of the Cisco router. In the first section here I am configuring the settings of the VPN tunnel:
crypto isakmp policy 10
encr aes 256
authentication pre-share
group 14
lifetime 3600
crypto isakmp invalid-spi-recovery
crypto isakmp keepalive 10
!
crypto ipsec transform-set aes256-sha esp-aes 256 esp-sha-hmac
mode tunnel
!
!
crypto ipsec profile boat-vpn
set transform-set aes256-sha
set pfs group14
With all the options set I can build the tunnel itself. The first tunnel is the one wireless in the factories. I have put the connection into a separate vrf to avoid conflicts between the two connections. I also want all the internet traffic to go over the “expensive connection”. Since the boats visit different factories I only have a dynamic IP at the boats. Every time they arrive at a factory they will receive a new IP, so the tunnel is configured with aggressive mode and identified by the fqdn name. Also remember to use another password than supersecret 🙂
ip vrf factorywireless
crypto isakmp peer address 192.168.2.1 vrf factorywireless
set aggressive-mode password supersecret
set aggressive-mode client-endpoint fqdn boat.example.com
For the second and primary connection I will use the default router instance. This is the connection that will have coverage most of the time and is where the internet traffic will be running . This connection is also using aggressive mode.
crypto isakmp peer address 8.8.8.8
set aggressive-mode password supersecret
set aggressive-mode client-endpoint fqdn boat-dialup.example.com
The interfaces for the tunnel are configured pretty straight forward as a normal VTI interfaces. The only difference is that the tunnel that connects from the factorywireless vrf has a line about that.
interface Tunnel1
description Tunnel over ICE
ip address 10.0.1.6 255.255.255.252
tunnel source FastEthernet4
tunnel mode ipsec ipv4
tunnel destination 8.8.8.8
tunnel protection ipsec profile boat-vpn
!
interface Tunnel105
description Tunnel over Wireless at factories
ip address 10.0.1.2 255.255.255.252
tunnel source Vlan110
tunnel mode ipsec ipv4
tunnel vrf factorywireless
tunnel destination 192.168.2.1
tunnel protection ipsec profile boat-vpn
The last thing we need to do on the Cisco router is to configure the BGP. This is to make sure the traffic is routed on the correct path. You can see that I have added route map prepend-internet where I have configured 4 extra prepends to the AS path. I only configure the AS path on an outgoing basis so you will see the same amount of prepends on the Netscreen. The prepend is only configured on the traffic going over the expensive internet connection.
router bgp 64501
bgp log-neighbor-changes
network 10.2.1.0 mask 255.255.255.192
neighbor 10.0.111.1 remote-as 64590
neighbor 10.0.111.1 route-map prepend-internet out
neighbor 10.0.111.5 remote-as 64500
!
route-map prepend-internet permit 10
 set as-path prepend 64501 64501 64501 64501
That completes the configuration of the Cisco router. We will now start on the configuration on the SSG550M. I will start with the configuration of the VPN proposal. It’s important that these match the Cisco device that we tested with before.
 set ike p1-proposal "vpn-boats-phase1" preshare group14 esp aes256 sha-1 second 3600
 set ike p2-proposal vpn-boats-phase-2 group14 esp aes256 sha-1 second 3600
Then we will create the connection for the VPN tunnels. We will start on the factory wireless connection. Since we never know what IP address the tunnel is coming from this will be an aggressive tunnel. Remember to type the fqdn name for the connection correct in the first line and choose the correct interface. The interface that you bind the connection to is also important to remember since you will create it in the next section.
set ike gateway "vpn-boats-fb4" address 0.0.0.0 id "boat.example.com" Aggr outgoing-interface "redundant1" preshare "supersecret" proposal "vpn-boats-phase1"
 set vpn vpn-boats gateway vpn-boats replay proposal vpn-boats-phase-2
 set vpn vpn-boats bind interface tunnel.1
 set vpn vpn-boats monitor optimized rekey
The second connection is almost the same but it contains NAT traversal and is using another incoming interface. The NAT traversal is enabled since I don’t get a public IP on the boat towards the internet.
 set ike gateway "vpn-boats-cellular" address 0.0.0.0 id "boat-dialup.example.com" Aggr outgoing-interface "redundant2" preshare "supersecret" proposal "vpn-boats-phase1"
 set ike gateway vpn-boats-cellular nat-traversal
 set vpn vpn-boats-cellular gateway vpn-boats-cellular replay proposal vpn-boats-phase-2
 set vpn vpn-boats-cellular bind interface tunnel.2
 set vpn vpn-boats-cellular monitor optimized rekey
 unset vpn vpn-boats-cellular dscp-mark
The last thing needed before getting the connection up on the VPN tunnel is creating the tunnel interfaces.Remember to choose the address that you are peering with on the BGP and the tunnel number you did bind in the previous section
 set interface tunnel.1 zone vpn-boats
 set interface tunnel.1 ip 10.0.111.1/30
set interface tunnel.1 protocol bgp
set interface tunnel.1 protocol ping
 set interface tunnel.2 zone vpn-boats
set interface tunnel.2 ip 10.0.111.5/30
set interface tunnel.2 protocol bgp
set interface tunnel.2 protocol ping
Now your tunnel should be UP and running and you can do a ping test to verify the connection between them. We will now start on the final part that is the BGP configuration. I am expecting that the BGP config on the device itself is done when writing this so I wont include all the BGP configuration. Only the important part 🙂
I’m beginning with creating the route-map to prepend the traffic over the VPN. The route map will be named internet-prepend. The AS number on the local router is 64500.
set vrouter trust-vr
 set route-map name internet-prepend permit 1
 set match ip 20 10
 set as-path 12
 exit
set protocol bgp 64500
 set as-path-access-list 12 permit "64500 64500"
Then I will start configuring the neighbor connections. The first will be the BGP going over the internet and is having the prepend enabled. The rest of the configuration is straight forward.
set neighbor 10.0.111.6 remote-as 64501 local-ip 10.0.111.5/30
set neighbor 10.0.111.6 activate
set neighbor 10.0.111.6 force-reconnect
set neighbor 10.0.111.6 nhself-enable
set neighbor 10.0.111.6 reject-default-route
set neighbor 10.0.111.6 enable
set neighbor 10.0.111.6 route-map internet-prepend out
Then it’s the last BGP connection. It’s almost the same as the previous one except for the prepend.
set neighbor 10.0.111.2 remote-as 64501 local-ip 10.0.111.1/30
set neighbor 10.0.111.2 activate
set neighbor 10.0.111.2 force-reconnect
set neighbor 10.0.111.2 nhself-enable
set neighbor 10.0.111.2 reject-default-route
set neighbor 10.0.111.2 enable
That is all. If you have any questions or comments you can leave one in the comments section below.

Your style is really unique in comparison to other people I’ve
read stuff from. Thank you for posting when you’ve got the opportunity, Guess I will
just book mark this page.